Toolbar
The Editor Toolbar is a convenient way to access commonly used commands. Please see below for labelled close up of the Editor Toolbar. A description of each of its components follows:
1. Open File/Folder - Opens a new file, folder or recent message in a new tab. See Opening/Loading HL7 Messages for more details.
2. Save File - Saving allows changes made to a message collection to be persisted to disk. HL7Spy always saves the contents of a message collection to a new file.
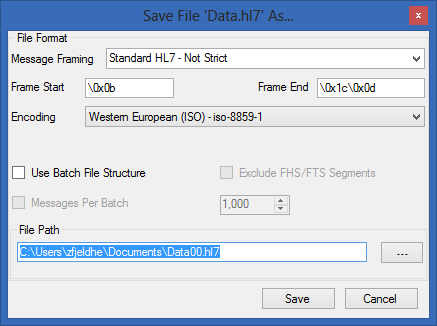
Clicking on the “Save File” toolbar button displays the following dialog which provides control over the location and format of the files being saved.
When the “Save” button is clicked, each message in the message collection will be written to the file specified in the “File Path” textbox, using the specified character encoding. The Frame Start/Frame End specify how messages are delimited. By default, Standard HL7 Message Framing is used with each message preceded by the byte 0x0B and proceeded by 0x1C0X1D. This results in messages stored with the following format: 0BMSH....1C0D0BMSH...1C0D.....
3. Close File - Closes the active message tab. Files can also be closed by using the File/Close menu option, clicking on a tab with the middle mouse button, or using the Control-Q key combination.
4. Print Current Message - Prints the active message tab. Messages can also be printed by clicking the same icon in the bottom right-hand corner of the message editor.
5. Search - In addition to the Quick Search functionality provided in the Navigation Bar, HL7Spy provides another, more robust search tool. See Search Messages for more details.
6. Sort - Allows messages within a Message Collection to be sorted by one or more HL7 fields, or by message size/offset. Changing the order of the messages in the Message Collection affects the order in which messages are used in other parts of the application such as HL7 Send, the Message Editor, etc. See Sort Messages for more details.
7. Merge Message Collections - Messages from multiple tabs can be merged together into a single tab using the “Merge Messages” dialog. See Merge Messages for more details.
8. Split Message Collections - Break messages out from one message collection into separate files or messages collections. See Split Messages for more details.
9. Clean-up Messages - The “Clean-up Messages Dialog” provides options to remove duplicate messages, remove ACKs, or messages that match a user defined specification, from the current message collection. A screen shot of this dialog follows. The options should be self evident.
10. Send HL7 - Allows one or more messages in a Message Collection to be sent to another HL7 system using the Minimal Lower Layer Protocol (MLLP) protocol as defined in the HL7 2.x standard. You can also send messages between message tabs within HL7Spy. See Send HL7 (MLLP) for more details.
11. Receive HL7 - Sets up HL7Spy as a HL7 Receiver using the Minimal Lower Layer Protocol (MLLP) protocol as defined in the HL7 2.x standard. You can also receive messages from another messages tab within HL7Spy. See Receive HL7 (MLLP) for more details.
12. Sub-Component Statistics - Provides statistics for a specific HL7 sub-component for all messages in a Message Collection. This is a very powerful feature of HL7Spy because it gives you the distribution of all values found in a given field. This functionality can also be accessed by holding down the Control key and double-clicking on a sub-component in the Message Editor, by right-clicking a field in the Message Editor and selecting the “Sub-Component Statistics” menu option, or by selecting “Tools/Calculate Subcomponent Statistics” from the main menu. See Toolbar Statistics for more details.
13. Component Statistics - Provides the same functionality as Sub-Component Statistics, except the statistics are at the Component level instead of the Sub-Component level. This functionality can also be accessed by double-clicking on a Component in the Message Editor, by right-clicking a Component in the Message Editor and selecting the “Component Statistics” menu option, or by selecting “Tools/Calculate Components Statistics” from the main menu. See Toolbar Statistics for more details.
14. Repeat Statistics - Provides the same functionality as Sub-Component Statistics, except the statistics are at the Repetition separator level instead of the Sub-Component level. This functionality can also be accessed by double-clicking on a Repetition separated section in the Message Editor, or by right-clicking a Repetition separated section in the Message Editor and selecting the “Repeat Statistics” menu option. See Toolbar Statistics for more details.
15. Field Statistics - Provides the same functionality as Sub-Component Statistics, except the statistics are at the Field level instead of the Sub-Component level. This functionality can also be accessed by double-clicking on a Field in the Message Editor, by right-clicking a Field in the Message Editor and selecting the “Field Statistics” menu option, or by selecting “Tools/Calculate Field Statistics” from the main menu. See Toolbar Statistics for more details.
16. Advanced Statistics - Allows you to be a bit more granular with your statistic results. You are given the option of the four above (Sub-Component, Component, Repeat, or Field) and further filter options. See Toolbar Statistics for more details.
17. Add Watch - This button adds the field currently selected in the Message Editor window to the active Watch List. See Watch Window for more details.
18. Highlight Fields by Field Name - Use this feature to highlight a particular field by the name of the field. For instance, typing in “doctor” in the pop-up dialog will highlight all the doctor fields in the message, e.g. Attending Doctor, Referring Doctor, etc.
19. Field Tooltips - By default, tooltips are displayed when you move the cursor around, or click on fields, in the Message Editor. Tooltips can be disabled by clicking on this button.
20. Change Character Encoding - Use this option to change the character set that HL7Spy uses to display messages.
21. Change Message Framing - Messages within a stream, such as a file, are identified with a start signature, and an end signature. In HL7Spy this is called Message Framing. This option allows control over how HL7Spy interprets the start and end of a message. See Message Framing for more details.
22. Message Properties/Hex Editor - Displays a hexadecimal display of the current message in the Message Editor as well as some information about it's character encoding, the file the message belongs to, the message offset and size, and whether it has been modified or not. See Message Properties for more details.
23a. Show Messages Using Standard Encoding - HL7 allows messages to be encoded using characters other than the beloved |^~\& characters found in most HL7 Messages. Why anyone would use characters other than these is beyond understanding, however; the standard permits it. If you are used to seeing messages using the standard encoding characters, your brain gets used to viewing and automatically parsing this format. Switch the encoding characters and your brain suddenly has a very difficult time processing what it sees. Enabling this feature (the default), automatically displays any message using the default encoding. It does not change how the message is sent stored on disk, or how it is sent out via MLLP, just how it is displayed in the Message Editor.
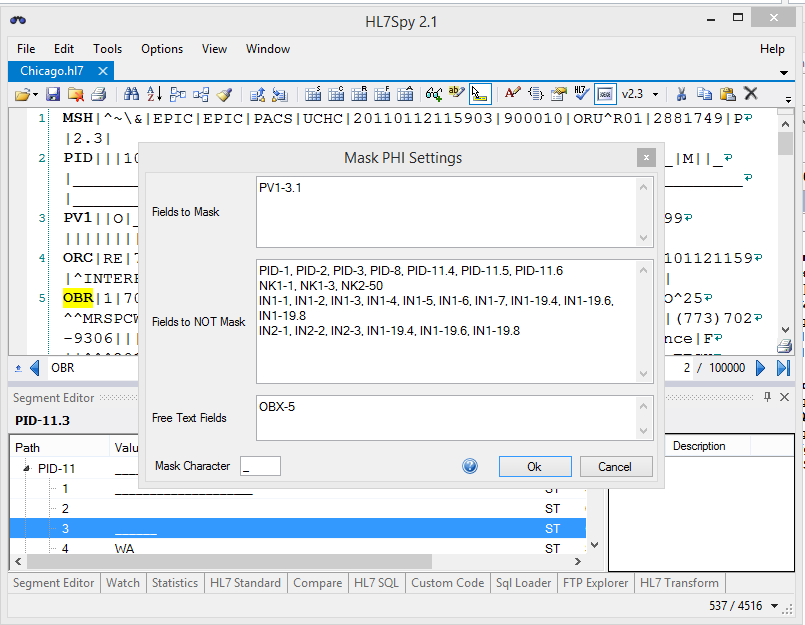
23b. Mask Private Health Information - Turn on/off whether or not the fields specified in "Options/Mask PHI Fields Settings..." are used to hide fields within the HL7 Editor.
"Fields to Mask" - Identify specific fields that will be masked in the HL7 message.
"Fields to NOT Mask" - All fields in the HL7 segment that are not identified here will be masked
"Fields to Mask" - Fields identified here will have PHI found in the "Fields to Mask" and "Fields to NOT Mask" sections masked.
"Mask Character" - Specify the character that will be used to "mask" the PHI.
24. Specify HL7 Message Version - This allows you to specify the version of HL7 you are using, versions 2.1-2.7 are supported. You may also opt to have HL7Spy automatically detect the version for you.
25. Cut Current Message - Cuts the currently displayed message in the Message Editor, to the clipboard.
26. Copy Message To Clipboard - Copies the currently displayed message in the Message Editor, to the clipboard.
27. Paste Message - Pastes the message currently in the clipboard into the current Message Collection. When “Paste Message” is selected, a dialog pops up and asks whether the message should be 1) inserted before the current message, 2) inserted after the current message, or 3) overwrite the current message.
28. Delete Current Message - Removes the current message from the active Message Editor.
Note: the message data on disk is not removed, it is just removed from the visible Message Collection. However, saving the file will remove the message.
29. Insert New Message Before - Inserts a new, empty HL7 Message. The new message is placed before the current message in the Message Editor.
30. Insert New Message After - Inserts a new, empty HL7 Message. The new message is placed after the current message in the Message Editor.
31. Send Current Message to Left Compare Window - Sends the current message to compare window on the left to find the differences between it and the message in the right compare window. See HL7 Compare for more details.
32. Send Current Message to Right Compare Window - Sends the current message to compare window on the right to find the differences between it and the message in the left compare window. See HL7 Compare for more details.
33. Show/Hide MainMenu - Allows you to show or hide the MainMenu shown to the right.
34. Auto/Manual Message Load - This feature tries to automatically detect new messages every five seconds and load them into the Message Editor.


