/
Editor/Home Toolbar
Editor/Home Toolbar
Home/Editor Toolbar
The Home/Editor Toolbar is a convenient way to access commonly used commands. Please see below for labelled close up of the Editor Toolbar.
Table of Contents
File
Open - Open a file containing HL7 Messages
- Clicking the Open button displays the standard Windows Open File Dialog. The Open File Dialog allows you to multi-select files to be opened.
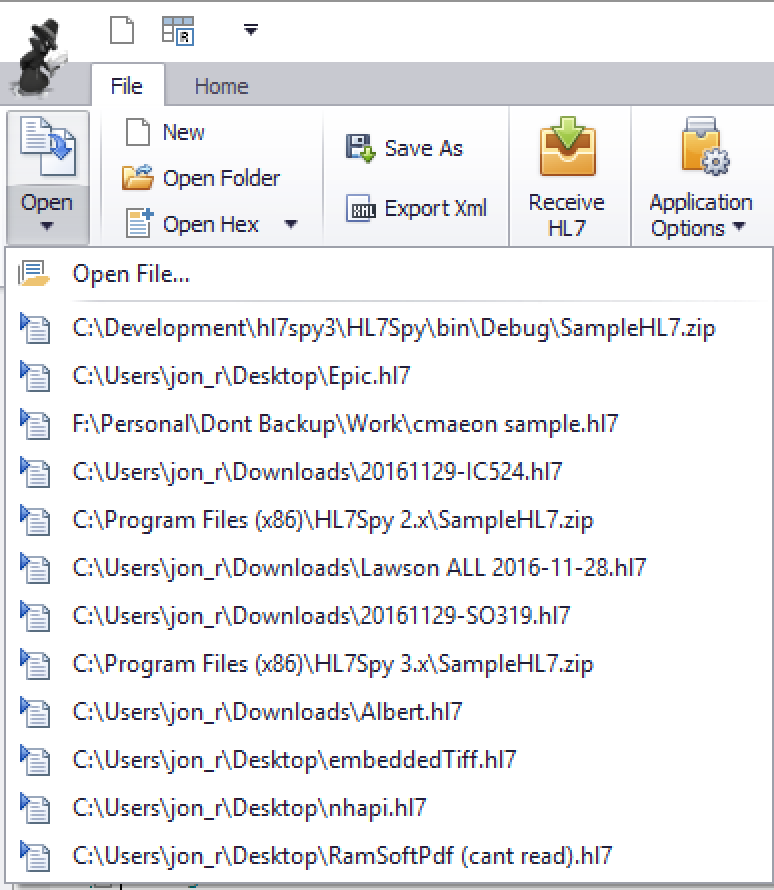
- Clicking just under the Open button will display a list of most recently opened files for quick access.
- You can also open files by dragging and dropping files into HL7Spy, or by using the "Open Folder" tool.
Tools
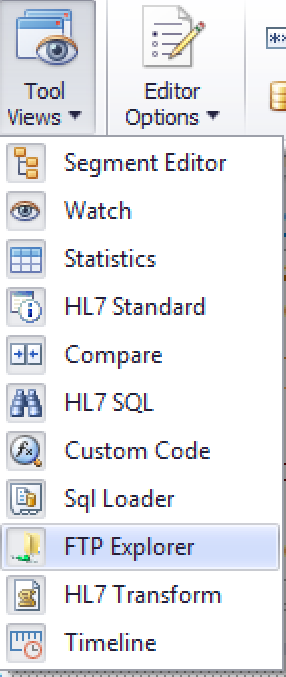
Tool Views - Show/Hide the tool windows
- The tool windows that appear at the bottom portion of the application can be shown, or hidden based upon the user's preference. If there are tools you do not use, they can be hidden by deselecting items in the drop-down list.
Options
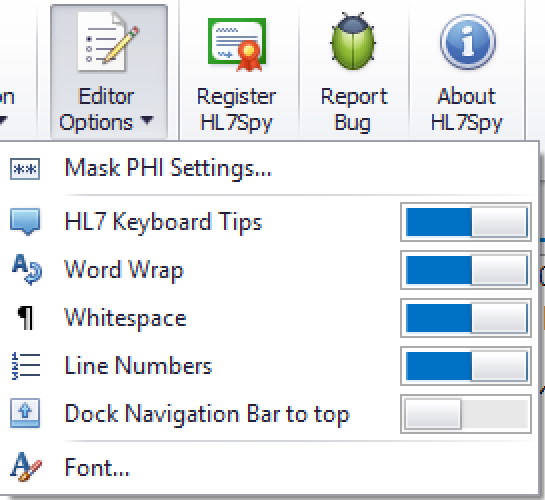
Editor Options - Change the operational characteristics of the editor
- Mask PHI Settings - Controls which fields are masked when Masking is turned on in the editor. See Mask PHI Settings...
- HL7 Keyboard Tips - Turn on/off the tooltip that is displayed when a field is selected in the editor. Tip: These tooltips are also displayed when you hold the shift key down while hovering the mouse over a field.
- Word Wrap - Turn on/off word wrapping when lines in the editor are longer than the display area.
- Whitespace - Show/hide the whitespace within the message.
- Line Numbers - Show/hide the line numbers that are displayed in the editor.
- Dock Navigation Bar to top - This option allows you to control the location of the message navigation control. By default, the message slider, search box, and navigation controls are docked just below the editor. Some users prefer to have these controls docked on top of the editor.
- Font - Change the font family and size used by the editor.
Mask PHI - Mask Private Health Information
- Turn on/off masking of PHI such as names, birthdays, etc in the HL7 editor.
Mask PHI Settings - Mask Private Health Information Field Settings
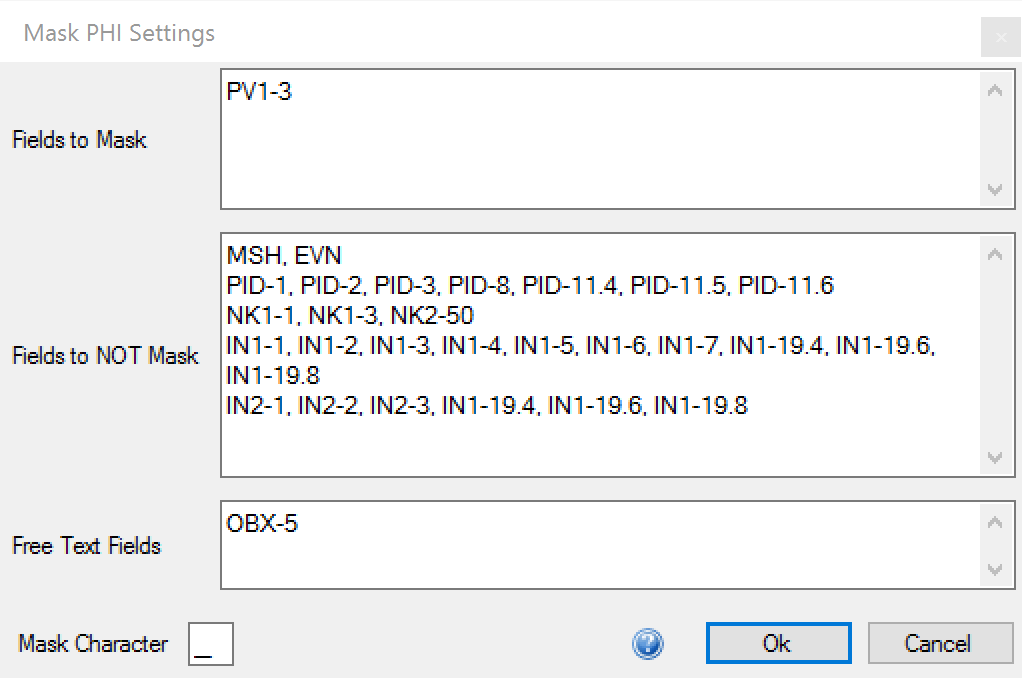
- Which fields are masked are controlled by settings under: "Editor Options\Mask PHI Settings..."
- Default Masking - All fields in segments that are not mentioned in "Fields to Mask" and "Fields to NOT Mask" and "Free Text Fields" are fully masked.
- Fields to Mask - Fields specified in this section will be masked. Other fields in the message will remain unmasked.
- Fields to NOT Mask - Fields specified in this section will NOT be masked. To NOT mask an entire segment, specify just the segment name.
- Free Text Fields - Fields identified here will have PHI text automatically masked. Any text that matches any field that was masked in other parts of the message will be masked.
- Mask Character - Specify the character that will be used to "mask" the PHI.
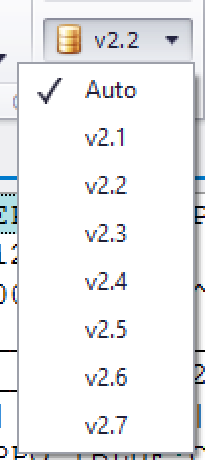
HL7 Standard Version - Version of HL7 Standard used in the editor
- Specifies the version of HL7 that is being used to display keyboard tooltips, searches, and other tools that rely on knowledge of the HL7 data types and field names.
- When set to "Auto" the version will automatically be chosen based on the value in MSH-12 from the message currently displayed in the editor.
Find
Find - Search messages in the current tab
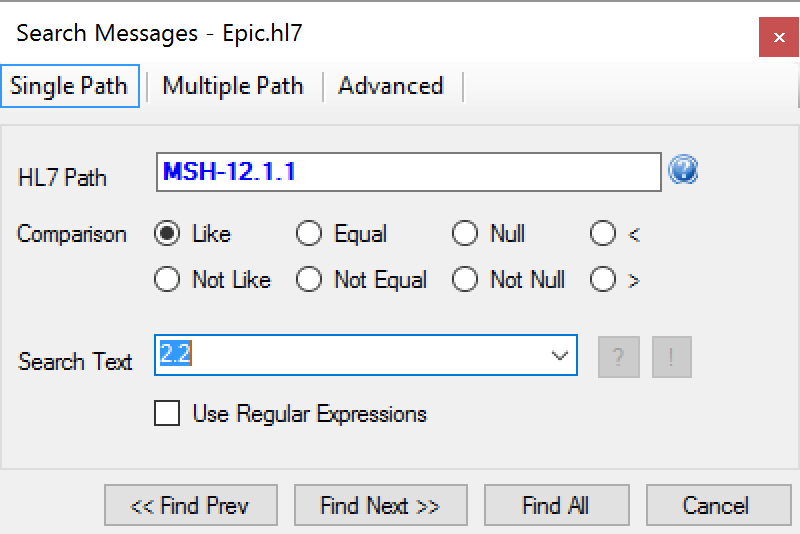
- Single Path - Find messages where the value of the HL7 Path matches the text specified in the "Search Text" field.
- HL7 Path - The location of the field that the match should operate against. For example, MSH-12 is the 12th field in the MSH and represents the HL7 version of the message.
- Comparison - The type of comparison that should be made.
- Search Text - The text value that will be used to compare against the value from the specified HL7 path.
- Find Previous - Find the previous message that matches the specified constraint.
- Find Next - Find the next message that matches the specified constraint.
- Find All - Create a new Tab and populate it with messages that match the specified constraint.
- Cancel - Exit out of this dialog.
Highlight - Mark matching fields
- Search and highlight in yellow fields that match the specified text.
- Search and highlight in yellow fields where the name of the field as defined by the HL7 Standard matches the specified text.
Watch - Track the selected field in the Watch Window
- See Watch Window
Edit
Cut - Cut the current message
- Deletes the current message and places its contents on the clipboard.
Copy - Copy message
- Copies the current message to the clipboard.
Paste - Paste message
- Pastes the text in the clipboard into the current message tab.
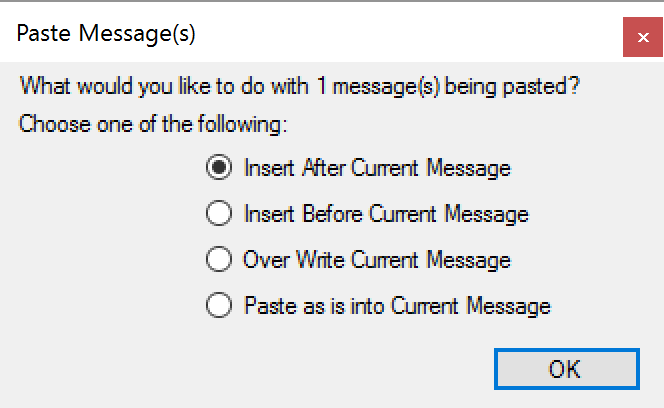
- Multiple messages can be pasted into a tab and HL7Spy will automatically split them into individual messages.
- If you paste a message into a non-empty editor, the following dialog will be present that determines how the messages are handled.
Add Before - Add a new message before the current message
- Add an empty message before the message currently displayed in the editor.
Add After - Add a new message after the current message
- Add an empty message after the message currently displayed in the editor.
Delete - Delete the current message
- Delete the message currently displayed in the editor.
Comm - HL7 Communications
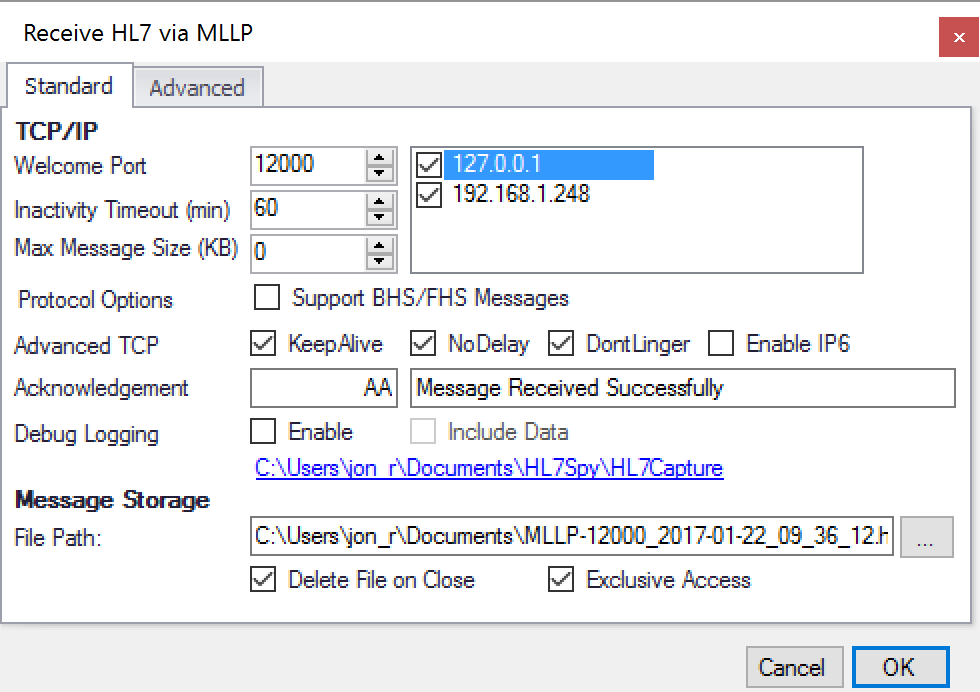
Receive HL7 - Receive HL7 Messages over TCP/IP using the MLLP Protocol
- Welcome Port - The Windows Network Port that HL7Spy will listen on for incoming connections.
- Network Interface (to the right of the Welcome Port) - Network Interfaces available on the local machine. By default, all interfaces are listened on.
- Inactivity Timeout - Time in minutes before the connection will be closed due to inactivity
- Max Message Size - The maximum size in KB that HL7Spy will receive. A setting of 0 means there is no size limit.
- Support BHS/FHS Messages - Turn on/off HL7 batch message protocol option
- Acknowledgement - Set the HL7 ACK return code and message send back to the sending party
- Debug Logging - Turn on/off logging of the HL7 protocol. This is good for troubleshooting connectivity issues.
- File Path - The location that will be used to store the incoming messages
- Delete File on Close - When selected, the file containing the messages will automatically be deleted when the tab is closed
- Exclusive Access - Turn on/off sharing of the file
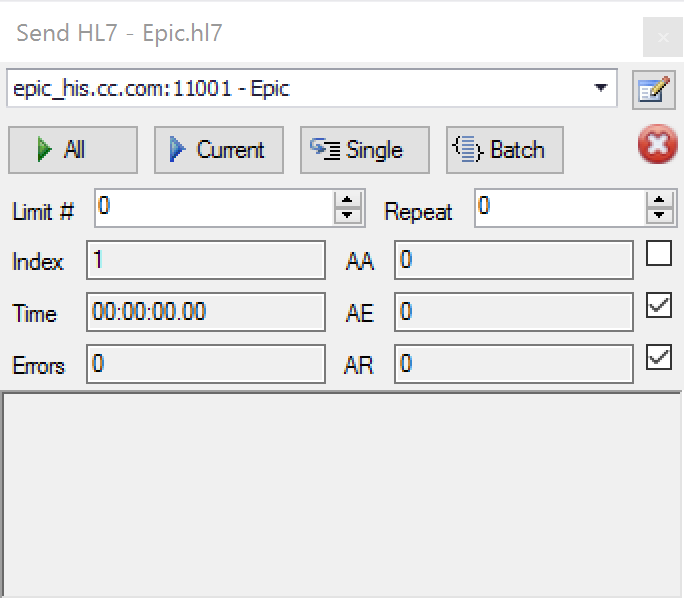
Send HL7 - Transfer HL7 messages via TCP/IP over MLLP
- Destination drop-down - See Manage Destinations.
- All - Send all messages from index 1 to the end to the selected destination.
- Current - Send all messages from the current index to the end to the selected destination.
- Single - Send the currently selected message to the selected destination, and advance to the next message if it is sent successfully.
- Batch - Send messages as an HL7 message batch.
- Limit # - Stop sending messages after the specified number of messages have been sent. Setting 0, specifies not to stop.
- Repeat - Send the HL7 messages once, then repeat the number of times specified in the field.
- Index - Index of the message currently being sent.
- AA - Application Accept count.
- AE - Application Error count.
- AR - Application Reject count.
- Message Area - Error messages are displayed in the text area at the bottom.
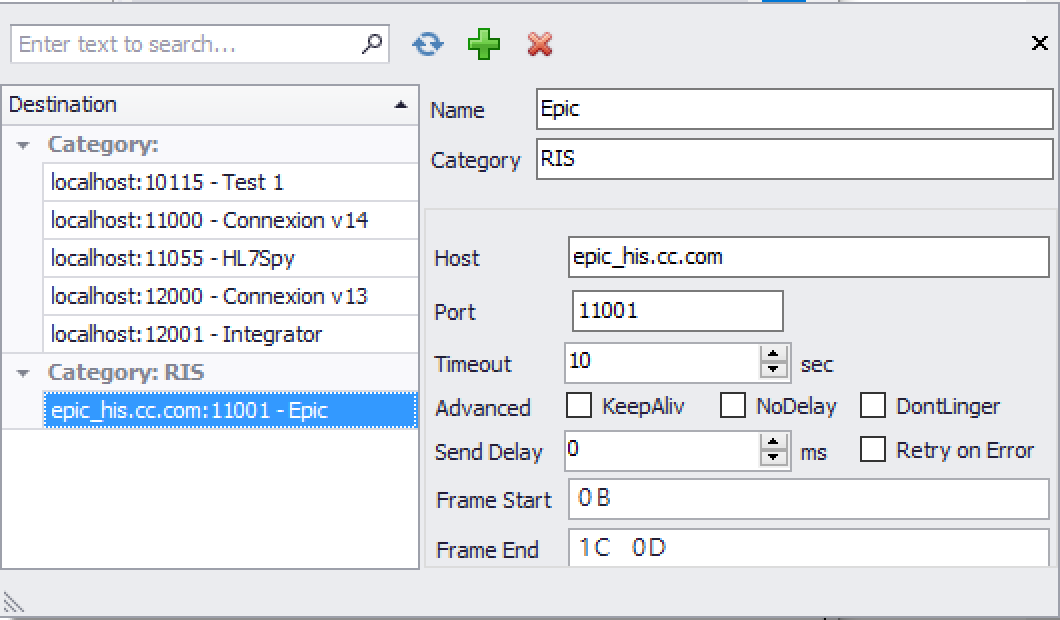
Manage Destinations - Select/Add/Edit HL7 destinations
- The Manage Destinations dialog displays a list of currently configured HL7 Send Destinations.
- Refresh - Re-read the configuration from the disk.
- + - Add a new destination.
- x - Delete the currently selected destination.
- Name - User-defined name of the destination.
- Category - User-defined grouping of destinations.
- Host - Host name or IP address of the destination.
- Port - The communications port that communicates with the receiving party will be initiated over.
- Timeout - The number of seconds before operations send/receive operations timeout.
- KeepAlive - Low-level TCP/IP setting on the socket to keep the communications link between the sender and receiver active.
- NoDelay - Low-level TCP/IP socket that controls the use of Nagle's algorithm.
- DontLinger - Low-level TCP/IP socket option that affects the behavior of the socket when close is called.
- Send Delay - Introduces a delay between messages being sent, the default is 0, or no delay.
- Retry on Error - Automatically reconnect and retry when a failure occurs during a transfer.
- Frame Start - The byte sequence that indicates the start of an HL7 message.
- Frame End - The byte sequence that indicates the end of an HL7 message.
Statistics
Subcomp Stats - Sub-component Statistics
Comp Stats - Component Statistics
Field Stats - Field Statistics
Other - Repeated Field Statistics and Advanced Statistics
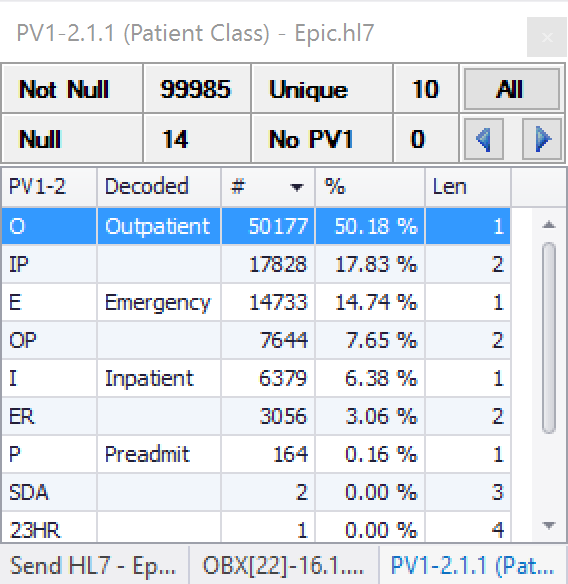
- Displays statistics for the field under the cursor for all messages in the current tab.
- Not Null - The number of messages where the field is not missing, or empty.
- Null - The number of messages where the field is missing, or empty.
- Unique - The number of unique values found for this field.
- No SEG - The number of messages where the segment containing the requested field is missing.
- All - Create a new Tab and place a copy of all messages containing the selected value into this Tab.
- Left Arrow - Go to the previous message containing the selected value.
- Right Arrow - Go to the next message containing the selected value.
- Value Column - All values found in the specified field.
- Decoded Column - For fields defined by HL7 this column shows the full name of the decoded value.
- # Column - The number of messages that contained the value from the Value column.
- % Column - The percentage of time the value was found in the current Tab.
- Len Column - The length of value .
- See Field/Component/Sub-component Statistics for more details
Compare
To Left Compare - Send to Compare Tool
- Send the current message to the left window of the Compare Tool. See HL7 Compare Tool
To Right Compare - Send to Compare Tool
- Send the current message to the right window of the Compare Tool. See HL7 Compare Tool.
Messsage Tools
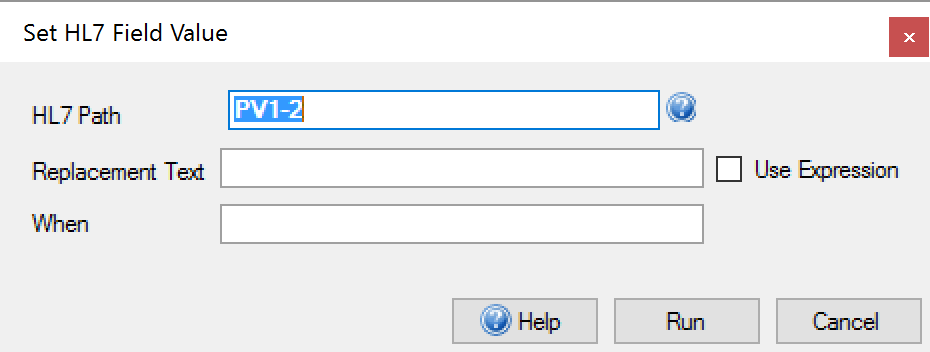
Set Field - Set the value of a field
- Set the value of a specific HL7 field for all messages in the current Tab. See HL7 Field for more details.
View Hex - View Hex Editor
- Show the currently displayed message in a Hex Editor. See Hex Editor for more details.
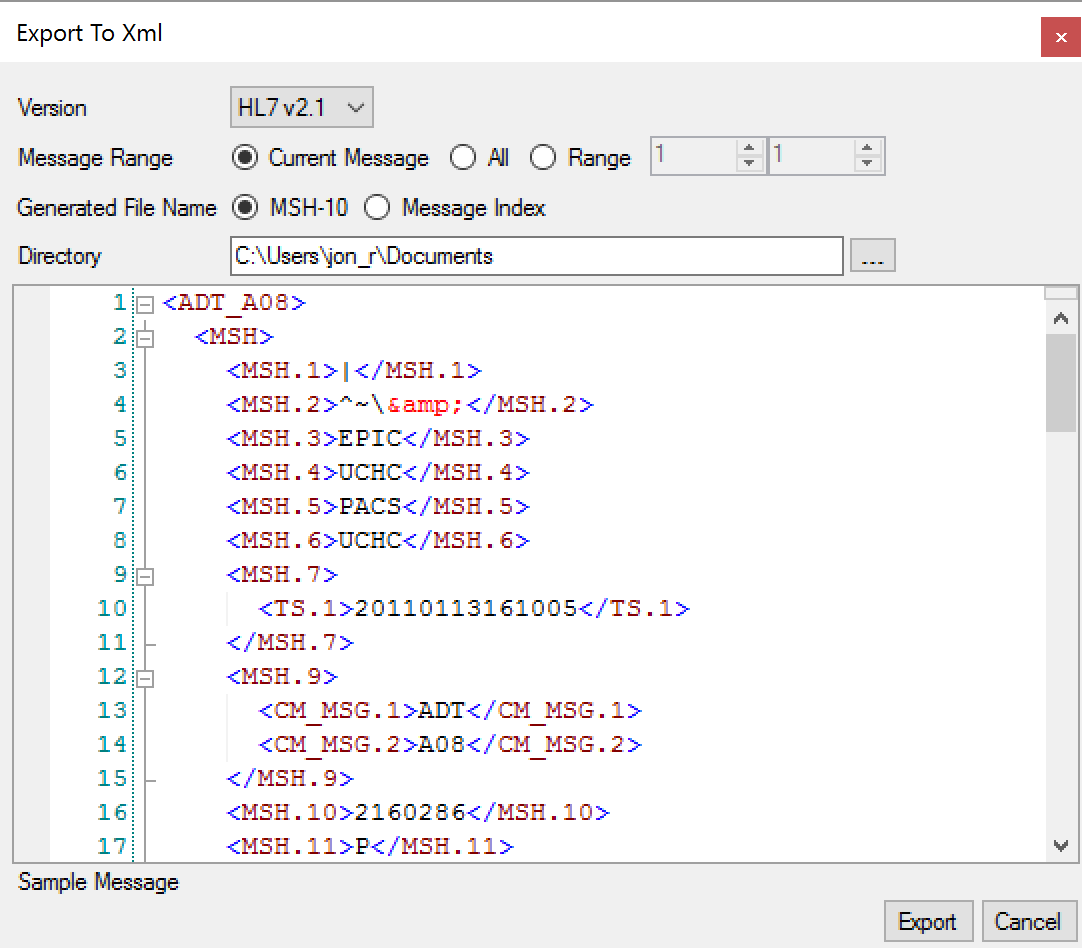
Eport Xml - Export the contents of the Editor to Xml
- Version - Allows users to select the version of Xml that should be generated.
- Message Range - Allows you to select a subset of messages to export.
- Generated File Name - Determine what is used to generate the file name of the Xml document.
- Directory - Where the Xml files should be written.
- Sample Message - Shows what the current message in the editor converts to in Xml.
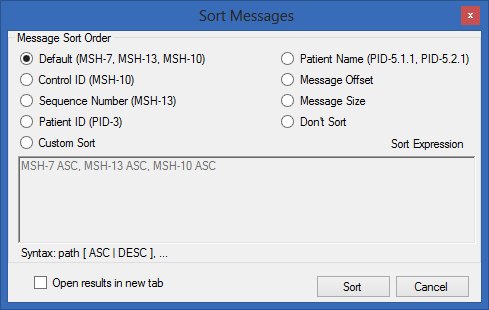
Sort - Sort Messages
- Allows messages within a Message Collection to be sorted by one or more HL7 fields, or by message size/offset.
- Changing the order of the messages in the Message Collection affects the order in which messages are used in other parts of the application such as HL7 Send, the Message Editor, etc. See Sort Messages for more details.
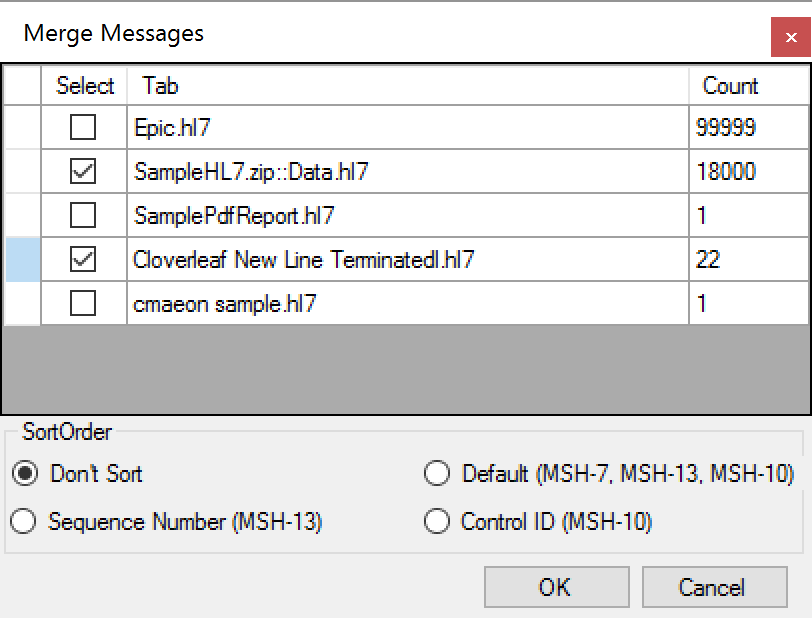
Merge Tabs - Message one or more tabs together
- Messages from multiple tabs can be merged together into a single tab using the “Merge Messages” dialog.
- In the example below the messages from the 2 selected Tabs will be combined into a single new tab.
- Sort Order - This option will sort the messages in the new tab.
Split Message Collections
- Break messages out from one message collection into separate files or messages collections. See Split Messages for more details.
Find Duplicates - Find messages that are duplicates
- Find duplicate messages based on the value in MSH-10 (Message Control ID).
- If any duplicates are found, they are placed in a separate tab.
Remove Duplicates - Remove messages that are duplicates
- Find and remove any duplicate messages based on the value in MSH-10 (Message Control ID).
- If any duplicates are found, a new Tab is created with the duplicates removed.
Advanced/Run Clean-up - Clean-up messages in the current Tab
- The “Clean-up Messages Dialog” provides options to remove duplicate messages, remove ACKs, or messages that match a user-defined specification, from the current message collection.
Advanced/Change Message Framing - Change how the messages are parsed in the current Tab
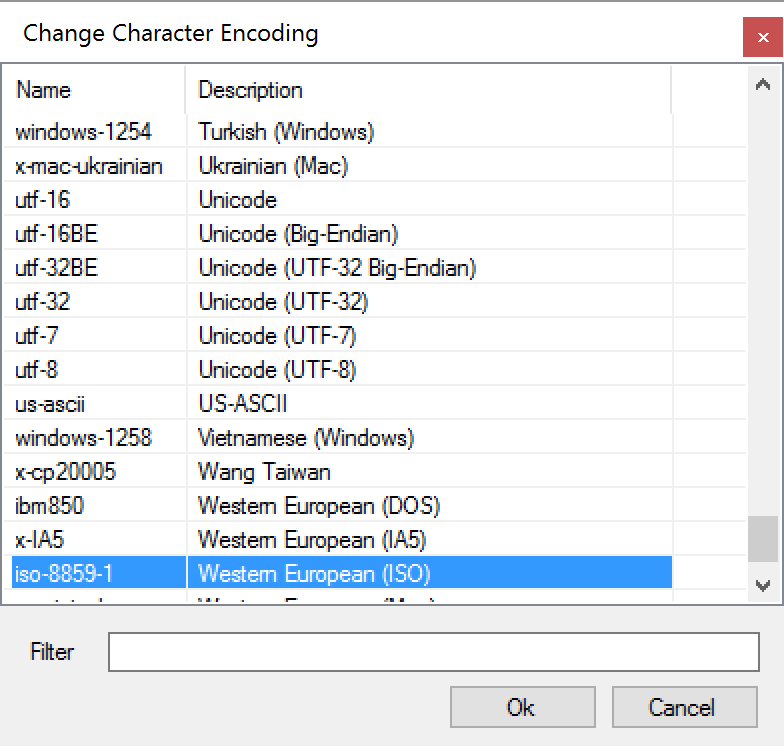
Advanced/Change Character Encoding
- Change how the bytes that are read from disk are converted to characters displayed in the UI.
- Select the character encoding from the dialog that is displayed.
Advanced/Show as if encoding were the standard |^~\& characters
- If a message uses non-standard encoding characters it can be difficult to look at. Use this feature to swap out the non-standard encoding characters for the standard ones.
, multiple selections available,
Related content
Mask Private Health Information
Mask Private Health Information
More like this
File Toolbar
File Toolbar
More like this
HL7Spy Quick Overview
HL7Spy Quick Overview
Read with this
Editor/Home Toolbar
Editor/Home Toolbar
More like this
Search Messages in Tab
Search Messages in Tab
Read with this
Mask Private Health Information
Mask Private Health Information
More like this

