File Toolbar
File/Application Toolbar
Table of Contents
File Operations
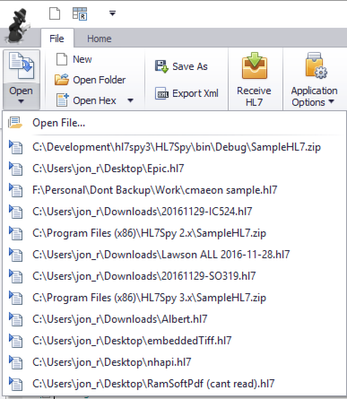
Open - Open a file containing HL7 Messages
- Clicking the Open button displays the standard Windows Open File Dialog. The Open File Dialog allows you to multi-select files to be opened
- Clicking just under the Open button will display a list of most recently opened files for quick access.
- You can also open files by dragging and dropping files into HL7Spy, or by using the "Open Folder" tool
New - Create a new, empty, HL7 file
- You can create a new file and copy and paste messages into the Editor
Open Folder - Open multiple files
- Directory - The location of the folder you wish to search for matching files
- File Search - A semicolon delimited list of file extensions to search for
- Recurse Subdirectories - Whether or not nested sub folders should be searched
- Content Search - Look at the contents of the file to see if there is a match. This is useful, for example, if you are search for a specific patient ID.
- Use Regex - Specify a more complex search by using a Regular Expression
- Match Case - Whether or not the case of the text should be considered in the match
- Merge files into a single file before loading - If you are opening many little files, it is best to merge them into 1 before loading them in HL7Spy
Open Hex - Open a file and display its contents in the Hex Editor
- Clicking the Open button displays the standard Windows Open File Dialog.
- Clicking to the right of the Open button will display a list of most recently opened files for quick access.
Save As - Save the contents of the current tab to a file
- Files in HL7Spy are always read only. Modifying a message in the editor does NOT edit the underlying file. This is by design.
- To save changes you must save the file to another file
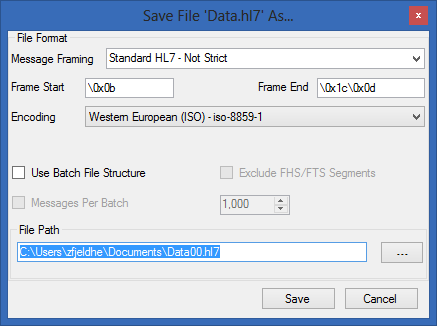
- Clicking on the “Save File” toolbar button displays the following dialog which provides control over the location and format of the files being saved.
When the “Save” button is clicked, each message in the message collection will be written to the file specified in the “File Path” textbox, using the specified character encoding. The Frame Start/Frame End specify how messages are delimited. By default, Standard HL7 Message Framing is used with each message preceded by the byte 0x0B and proceeded by 0x1C0X1D. This results in messages stored with the following format: 0BMSH....1C0D0BMSH...1C0D...
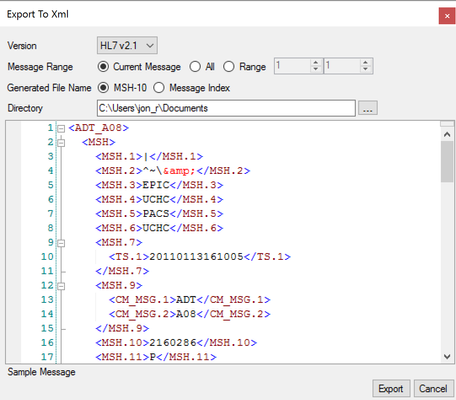
Eport Xml - Export the contents of the Editor to Xml
- Version of Xml that should be generated
- Message Range - Allows you to select a subset of messages to export
- Generated File Name - Determine what is used to generate the file name of the Xml document
- Directory - Where the Xml files should be written
- Sample Message - Shows what the current message in the editor converts to in Xml
HL7 Communications
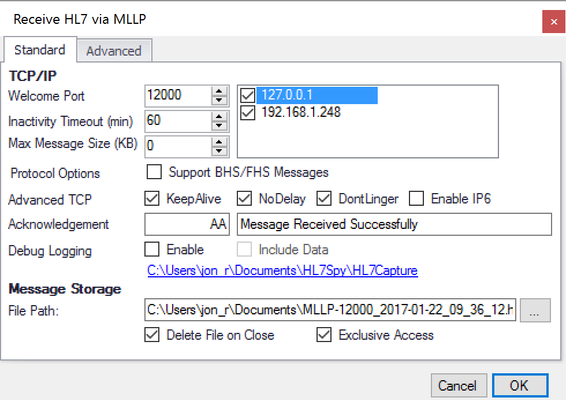
Receive HL7 - Receive HL7 Messages over TCP/IP using the MLLP Protocol
- Welcome Port - The Windows Network Port that HL7Spy will listen on for incoming connections.
- Network Interface (to the right of the Welcome Port) - Network Interfaces available on the local machine. By default all interfaces are listened on.
- Inactivity Timeout - Time in minutes before the a connection will be closed due to inactivity
- Max Message Size - The maximum size in KB that HL7Spy will receive. A setting of 0 means there is no size limit.
- Support BHS/FHS Messages - Turn on/off HL7 batch message protocol option
- Acknowledgement - Set the HL7 ACK return code and message send back to the sending party
- Debug Logging - Turn on/off logging of the HL7 protocol. This is good for troubleshooting connectivity issues.
- File Path - The location that will be used to store the incoming messages
- Delete File on Close - When selected, the file containing the messages will automatically be deleted when the tab is closed
- Exclusive Access - Turn on/off sharing of the file
Options
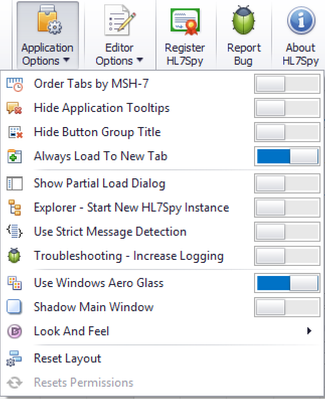
Application Options - Set options that affect the visual and operational characteristics of the application
- Order Tabs by MSH-7 - When enabled, tab are sorted in order of the date time value (MSH-7) found in the first message of each tab.
- Hide Application Tooltips - When you hover over buttons within the application tooltips that describe the functionality of button are displayed. This option allows you to disable these tooltips.
- Hide Button Group Title - The text below groups of buttons (for example "File Operations" under the "Open Hex" button) can be hidden to free up vertical display area.
- Show Partial Load Dialog - When loading a very large file, you might want to turn this feature on to only load a portion of the file instead of the entire contents
- Explorer - Start New HL7Spy Instance - When enable, a new instance of HL7Spy will be launched when opening a file from Windows Explorer. Otherwise; an existing instance of HL7Spy will be used to display the file
- Use Strict Message Detection - HL7Spy by default uses heuristics to determine the start and end of HL7 messages in a file. Turning on strict mode forces HL7Spy to use a less forgiving algorithm for this.
- Troubleshooting - Increase Logging - When you encounter a problem with HL7Spy our support team may ask you to turn this feature on to increase the amount of logging the application generates. Log files are located in Documents\HL7Spy\logs.
- Use Windows Aero Glass - Change the visual appearance of the application by turning on/off Windows Aero Glass
- Shadow Main Window - Turn on/off a shadow along the border of the main HL7Spy application window that makes it easier to see when HL7Spy is the active application
- Look And Feel - Change the application's coloring and how elements such as windows, buttons, and menus look and feel
- Reset Layout - Set the application back to its default layout.
- Reset Permissions - This option is enabled when HL7Spy is run as a user with Administrator rights to the machine. It resets the permissions on folder and registry entries that are used by HL7Spy and have been corrupted
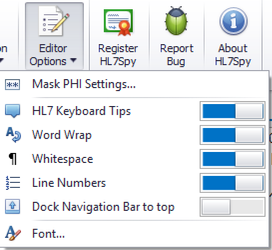
Editor Options - Change operational characteristics of the editor
- Mask PHI Settings - Controls which fields are masked when Masking is turned on in the editor. See Mask PHI Settings...
- HL7 Keyboard Tips - Turn on/off the tooltip that is displayed when a fields is selected in the editor. Tip: These tooltips are also displayed when you hold the shift key down while hovering the mouse over a field.
- Word Wrap - Turn on/off word wrapping when lines in the editor are longer than the display area
- Whitespace - Show/hide the whitespace within the message
- Line Numbers - Show/hide the line numbers that are displayed in the editor
- Dock Navigation Bar to top - This option allows you to control the location of the message navigation control. By default, the message slider, search box, and navigation controls are docked just below the editor. Some users prefer to have these controls docked on top of the editor.
- Font - Change the font family and size used by the editor.
Registration and Help
Register HL7Spy - Register your license to activate HL7Spy
Bug Report - Generate a zip file containing debugging information
- Clicking this button will open a new window that will allow you to enter information about an HL7Spy bug that you have found.
- When you select "Generate" a zip file will be created on your desktop that contains the information you entered as well as the log files from your c:\users\<your account>\Documents\HL7Spy\log directory
- When reporting a bug, please email us this file. It will help us troubleshoot the problem
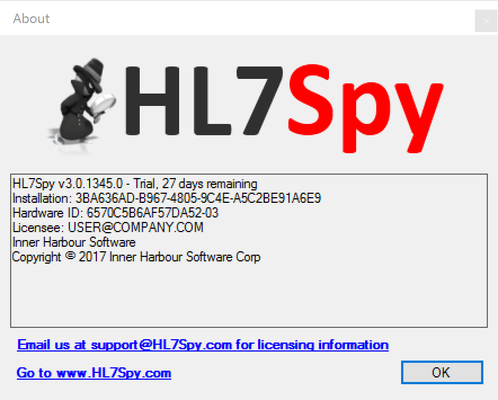
About HL7Spy - Shows information about your copy of HL7Spy
- Hardware ID - An identifier for your instance of HL7Spy
- Licensee - The email address, or owner of this copy of HL7Spy

