Before installing Connexion, please review the OS and software requirements. We strongly recommend you also review the hardware notes when sizing systems for production environments.
Prerequisites
We recommend installing the .NET framework 4.0 or 4.5 before installing Connexion. We also recommend that you have an instance of SQL Server 2008R2 or 2012 available before installing Connexion. Connexion does not require SQL Server be installed on the same machine, however this typically provides the best performance.
Downloads:
The latest release can be found here: Releases
Connexion is packaged as a single executable file for both 32-bit and 64-bit systems.
Components:
Connexion includes the following components:
- Connexion Server (Windows Service): The core engine which hosts and runs all channels/workflows.
- Connexion Client: The management application which allows for the creation and configuration of channels as well as administration of the Connexion server. Can be run on the same machine as the server, or on separate machines which have network connectivity with the server.
- Configuration Wizard: A server-side configuration utility which modifies global server settings (management ports, accounts, etc).
- System Tray Application (Server-side, Windows Application): A small utility which shows an icon in the system tray. This icon provides short-cuts to load the client and configuration wizard applications, as well as options to start, stop, and restart the Connexion Engine service.

Step-by-step Installation:
Once the Connexion installation package has been downloaded to the server, launch the installer.
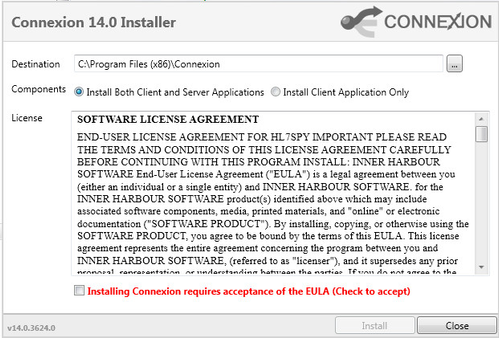
Set the destination folder, choose the components to be installed, and accept the EULA. Click 'Next.'
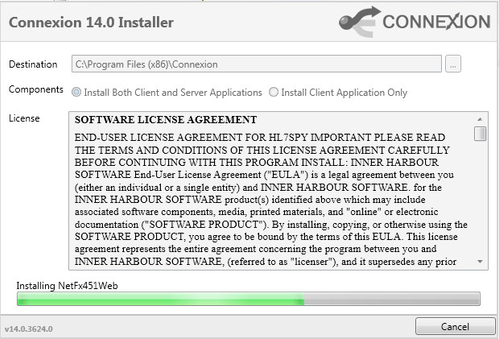
It is preferable to have .NET 4.5.1 installed prior to installing Connexion. However, if you do not have .NET 4.5.1 installed, the Connexion setup will perform the upgrade as required.
Once .NET is finished installing, click 'Next.'

Enter the Site Name, Licensee, and License Key (as provided by Inner Harbour). The Hardware ID will be populated automatically.

Click 'Next.'

Choose the Server Name from the drop-down (these options should be automatically populated based on your installation of SQL or SQL Express) and set the Catalog Name. In most cases, the default "CXN_Connextion" value can be accepted.
Because you have to authenticate against the database, choose whether this will be done with Windows authentication or SQL Server Authentication. If you choose SQL Server Authentication, make sure that the user exists in the database had has the appropriate permissions.
Click 'Next.'

Set the user account that will run the Connexion service. In general, the default Connexion Service Account, which has limited privileges, is desired. However, you can use the Local System Account or the Existing User Account if desired.
Depending on whether you chose Windows Authentication or SQL Server Authentication on the previous screen, set the database credentials for the Connexion service.
Click 'Next.'

This screen lists a summary of the database components that will be installed. If this is correct, click 'Next.' If you need to change one of the components, click 'Previous' to make the appropriate adjustment.

Next, set the Connexion Confirmation Options. If the default ports as indicated above are available, accept the defaults. Otherwise, change them as necessary. The setup will display a green message for available ports, or a red message if the ports are unavailable.
Decide the level of Change Tracking you wish to perform: Always, Once Per Channel, or Never (which disables change tracking).
If you need to change the authorized users/groups, do so in the appropriate fields. Multiple users/groups are delimited with a semi-colon.
Click 'Next.'

Connexion will begin performing the installation tasks listed, and will track the status of each task: Complete, Running, or Pending. Once the list is complete, click 'Next.'

Once the installation process is complete, a confirmation screen will appear. To launch the client application, check the box and click 'Next.' To close the Installation Wizard without launching the client application, clear the check box.
You can re-run the Configuration Wizard by relaunching the Installation Wizard, either from the Windows start menu or the tray icon.